Difference between revisions of "Farm Maps"
User314159 (talk | contribs) (I meant "how fish gets hooked" in last edit summary.) |
m (Reorder list to match other farm types) |
||
| (18 intermediate revisions by 8 users not shown) | |||
| Line 26: | Line 26: | ||
! Associated Skill | ! Associated Skill | ||
|- | |- | ||
| − | | style="text-align:center;" | [[File:Standard Farm Map Icon.png|link=]]<br />Standard Farm | + | | style="text-align:center;" id="Standard"| [[File:Standard Farm Map Icon.png|link=]]<br />Standard Farm |
| style="text-align:center;" | [[File:Standard Farm thumb.png|200px|link=File:Standard Farm.png]] | | style="text-align:center;" | [[File:Standard Farm thumb.png|200px|link=File:Standard Farm.png]] | ||
| | | | ||
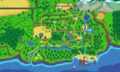
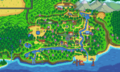
* The majority of this map is [[farming]] land, ideal for [[crops]] and [[animals]]. | * The majority of this map is [[farming]] land, ideal for [[crops]] and [[animals]]. | ||
| − | * The number of tillable tiles on this map is 3427, with 235 non-tillable but | + | * The number of tillable tiles on this map is 3427, with 235 non-tillable but buildable tiles. |
* The biggest contiguous rectangular area is 63 x 31 (1953) tiles. | * The biggest contiguous rectangular area is 63 x 31 (1953) tiles. | ||
| [[File:Farming Skill Icon.png|24px|link=]] [[Skills#Farming|Farming]] | | [[File:Farming Skill Icon.png|24px|link=]] [[Skills#Farming|Farming]] | ||
| Line 37: | Line 37: | ||
| style="text-align:center;" | [[File:Riverlands Farm thumb.png|200px|link=File:Riverlands Farm.png]] | | style="text-align:center;" | [[File:Riverlands Farm thumb.png|200px|link=File:Riverlands Farm.png]] | ||
| | | | ||
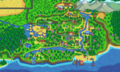
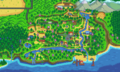
| − | * | + | * Water significantly decreases the overall farming area. |
| + | * Players start with a [[Fish Smoker]]. | ||
| + | * [[Fishing]] is viable on this farm:<ref name="fish" /> | ||
** 70% of the time, players will catch town river [[fish]], ''i.e.,'' [[fish]] that are found in [[Pelican Town]]. | ** 70% of the time, players will catch town river [[fish]], ''i.e.,'' [[fish]] that are found in [[Pelican Town]]. | ||
** 30% of the time, players will catch forest [[fish]], ''i.e.,'' [[fish]] that are found in [[Cindersap Forest]]. | ** 30% of the time, players will catch forest [[fish]], ''i.e.,'' [[fish]] that are found in [[Cindersap Forest]]. | ||
| − | ** | + | ** Random [[Fishing#Bubbles|Bubble Spots]] are enabled on this map, unlike for all other Farm Maps. |
| − | + | * The number of tillable tiles on this map is 1578, with 516 non-tillable but buildable tiles. | |
| − | |||
| − | * The number of tillable tiles on this map is 1578, with 516 non-tillable but | ||
| [[File:Fishing Skill Icon.png|24px|link=]] [[Skills#Fishing|Fishing]] | | [[File:Fishing Skill Icon.png|24px|link=]] [[Skills#Fishing|Fishing]] | ||
|- | |- | ||
| Line 60: | Line 60: | ||
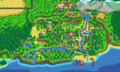
** Otherwise, players will catch only [[trash]]. | ** Otherwise, players will catch only [[trash]]. | ||
* Additional ponds and grass areas decrease the overall farming area. | * Additional ponds and grass areas decrease the overall farming area. | ||
| − | * The number of tillable tiles on this map is 1413, with 1490 non-tillable but | + | * The number of tillable tiles on this map is 1413, with 1490 non-tillable but buildable tiles. |
| [[File:Foraging Skill Icon.png|24px|link=]] [[Skills#Foraging|Foraging]] | | [[File:Foraging Skill Icon.png|24px|link=]] [[Skills#Foraging|Foraging]] | ||
|- | |- | ||
| Line 66: | Line 66: | ||
| style="text-align:center;" | [[File:Hilltop Farm thumb.png|200px|link=File:Hilltop Farm.png]] | | style="text-align:center;" | [[File:Hilltop Farm thumb.png|200px|link=File:Hilltop Farm.png]] | ||
| | | | ||
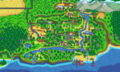
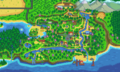
| − | * The southwest hill-top spawns [[Stone]]s, [[Blacksmith|Ore]] nodes, and [[Minerals#Geodes|Geode]] nodes depending on the player's Mining level. If farm quarry is cleared, it will usually regenerate 7-13 items every 4th day, which appears to be the optimal day to clear the farm quarry. The mining area may sometimes be blocked by a [[Large Stump]], [[Large Log]], or a [[Boulder]], making it impossible to enter until the player has the correct tool. | + | * The southwest hill-top spawns [[Stone]]s, [[Blacksmith|Ore]] nodes, and [[Minerals#Geodes|Geode]] nodes depending on the player's Mining level. If the farm quarry is cleared, it will usually regenerate 7-13 items every 4th day, which appears to be the optimal day to clear the farm quarry. The mining area may sometimes be blocked by a [[Large Stump]], [[Large Log]], or a [[Boulder]], making it impossible to enter until the player has the correct tool. |
* Additional cliffs and a stream decrease the overall farming area. | * Additional cliffs and a stream decrease the overall farming area. | ||
* When fishing:<ref name="fish" /> | * When fishing:<ref name="fish" /> | ||
** 50% of the time, players will catch forest river [[fish]], ''i.e.,'' [[fish]] that are found in the [[Cindersap Forest]] river. | ** 50% of the time, players will catch forest river [[fish]], ''i.e.,'' [[fish]] that are found in the [[Cindersap Forest]] river. | ||
** 50% of the time, players will catch only [[trash]]. | ** 50% of the time, players will catch only [[trash]]. | ||
| − | * The number of tillable tiles on this map is 1648, with 930 non-tillable but | + | * The number of tillable tiles on this map is 1648, with 930 non-tillable but buildable tiles. |
| [[File:Mining Skill Icon.png|24px|link=]] [[Skills#Mining|Mining]] | | [[File:Mining Skill Icon.png|24px|link=]] [[Skills#Mining|Mining]] | ||
|- | |- | ||
| Line 77: | Line 77: | ||
| style="text-align:center;" | [[File:Wilderness Farm thumb.png|200px|link=File:Wilderness Farm.png]] | | style="text-align:center;" | [[File:Wilderness Farm thumb.png|200px|link=File:Wilderness Farm.png]] | ||
| | | | ||
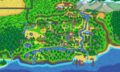
| − | * [[Monsters]] spawn at night (scales with the player's Combat level). | + | * [[Monsters]] spawn at night (scales with the player's Combat level). |
| + | ** This map can spawn more [[Wilderness Golem]]s than other farms if they have the [[Options#Advanced Options|"spawn monsters on the farm"]] option enabled. | ||
| + | ** Exclusive to this farm map, at Combat level 9 or higher, [[Iridium Golem]]s have a 50% chance to spawn. They have a chance to drop [[Iridium Ore]] and seeds normally obtained from [[Seed Spot]]s. | ||
* When fishing:<ref name="fish" /> | * When fishing:<ref name="fish" /> | ||
** 35% of the time, players will catch lake [[fish]], ''i.e.,'' [[fish]] that are found in [[The Mountain]] lake. | ** 35% of the time, players will catch lake [[fish]], ''i.e.,'' [[fish]] that are found in [[The Mountain]] lake. | ||
** 65% of the time, players will catch only [[trash]]. | ** 65% of the time, players will catch only [[trash]]. | ||
* Additional cliffs and ponds decrease the overall farming area. | * Additional cliffs and ponds decrease the overall farming area. | ||
| − | * The number of tillable tiles on this map is 2131, with 444 non-tillable but | + | * The number of tillable tiles on this map is 2131, with 444 non-tillable but buildable tiles. |
| [[File:Combat Skill Icon.png|24px|link=]] [[Skills#Combat|Combat]] | | [[File:Combat Skill Icon.png|24px|link=]] [[Skills#Combat|Combat]] | ||
|- | |- | ||
| Line 100: | Line 102: | ||
| style="text-align:center;" | [[File:Beach Farm.png|200px]] | | style="text-align:center;" | [[File:Beach Farm.png|200px]] | ||
| | | | ||
| + | * Sprinklers don't work in the sandy soil. | ||
| + | ** There is a patch of 202 tiles (10x20 plus 2) where sprinklers can be placed (requires clearing from trees and [[Large_Log|large logs]] with [[Axes|steel axe]] or better). | ||
* Good foraging and fishing, and a lot of open space. Sometimes, [[Supply Crate|supply crates]] wash up on shore. | * Good foraging and fishing, and a lot of open space. Sometimes, [[Supply Crate|supply crates]] wash up on shore. | ||
* Both forest and beach foragables may spawn. | * Both forest and beach foragables may spawn. | ||
| − | + | * Intended for "seasoned players", not as a first farm. A typical strategy of increasing crop fields and crafting large quantities of quality sprinklers won't work on this farm. | |
| − | * Intended for "seasoned players", not as a first farm. | + | ** Large open areas can be used to build [[Barn]]s, [[Coop]]s, [[Fish Pond]]s, or [[Shed]]s. [[Grass]] can grow on sandy soil. |
| − | |||
| − | ** | ||
* When fishing:<ref name="fish" /> | * When fishing:<ref name="fish" /> | ||
** 15% of the time, players will catch [[Seaweed]]. | ** 15% of the time, players will catch [[Seaweed]]. | ||
| Line 111: | Line 113: | ||
** 52.73% of the time, players will catch ocean [[fish]], ''i.e.,'' [[fish]] that are found in [[The Beach]]. | ** 52.73% of the time, players will catch ocean [[fish]], ''i.e.,'' [[fish]] that are found in [[The Beach]]. | ||
** 27.17% of the time, players will catch trash. | ** 27.17% of the time, players will catch trash. | ||
| + | * The number of tillable tiles on this map is 2700, with 1928 non-tillable but buildable tiles. | ||
| [[File:Foraging Skill Icon.png|24px|link=]] [[Skills#Foraging|Foraging]]<br /> [[File:Fishing Skill Icon.png|24px|link=]] [[Skills#Fishing|Fishing]] | | [[File:Foraging Skill Icon.png|24px|link=]] [[Skills#Foraging|Foraging]]<br /> [[File:Fishing Skill Icon.png|24px|link=]] [[Skills#Fishing|Fishing]] | ||
|- | |- | ||
| Line 117: | Line 120: | ||
| | | | ||
* Has a [[Grass#Blue Grass|chewy blue grass]] that [[animals]] love. | * Has a [[Grass#Blue Grass|chewy blue grass]] that [[animals]] love. | ||
| − | * Players start with a [[Coop]] and two [[chicken]]s. | + | * Players start with a [[Coop]] and two [[chicken]]s, randomly named. |
| − | * Instead of receiving 15 [[Parsnip Seeds]] from [[Lewis|Mayor Lewis]], the player instead receives 15 pieces of [[Hay]]. | + | * Instead of receiving 15 [[Parsnip Seeds]] from [[Lewis|Mayor Lewis]], the player instead receives 15 pieces of [[Hay]] from an unknown source. |
| − | * When fishing from the river, | + | * When fishing from the river, players have a 40% chance of catching forest pond [[fish]], ''i.e.,'' [[fish]] that are found in the [[Cindersap Forest]] pond. 60% of the time, players will catch trash.<ref name="fish" /> |
| + | * The number of tillable tiles on this map is 2066. | ||
| [[File:Farming Skill Icon.png|24px|link=]] [[Skills#Farming|Farming]] | | [[File:Farming Skill Icon.png|24px|link=]] [[Skills#Farming|Farming]] | ||
|} | |} | ||
| Line 147: | Line 151: | ||
{{History|1.4|Added Four Corners Farm Map.}} | {{History|1.4|Added Four Corners Farm Map.}} | ||
{{History|1.5|Added Beach Farm Map. Chat interface changes, which eliminated a bug preventing placement of path tiles near [[Cindersap Forest]]. [[Greenhouse]] can now be moved.}} | {{History|1.5|Added Beach Farm Map. Chat interface changes, which eliminated a bug preventing placement of path tiles near [[Cindersap Forest]]. [[Greenhouse]] can now be moved.}} | ||
| − | {{History|1.6|Added Meadowlands Farm Map. Players on the Riverland Farm Map get a [[Fish Smoker]] by default. Monsters now give 1/3 of normal Combat experience when spawned on the Farm.}} | + | {{History|1.6|Added Meadowlands Farm Map. Players on the Riverland Farm Map get a [[Fish Smoker]] by default. [[Iridium Golem]]s now spawn exclusively on the Wilderness Farm Map. Monsters now give 1/3 of normal Combat experience when spawned on the Farm.}} |
[[Category:Locations]] | [[Category:Locations]] | ||
Latest revision as of 23:02, 11 September 2024
This page or section contains unmarked spoilers from update 1.6 of Stardew Valley. Players may want to avoid or be cautious toward reading this article/section. |
- See also: Cabin, Cabin Locations

There are eight different Farm Maps to choose from in Stardew Valley. Each map features a unique layout of the Farm, offering different benefits and favoring specific skills. Only one map can be chosen when starting a new game, and cannot be changed once selected.
The Standard Farm offers the most space to plant crops and raise animals. The other seven farms lack farming area, but offer special perks in comparison:
- The Riverland Farm encourages Fishing.
- The Forest Farm encourages Foraging.
- The Hill-top Farm encourages Mining.
- The Wilderness Farm encourages Combat (but only gives 1/3 Combat experience for it).
- The Four Corners Farm offers perks from other maps and encourages Multiplayer.
- The Beach Farm offers extra items and encourages Fishing and Foraging, but discourages Farming late game.
- The Meadowlands Farm encourages Farming, specifically raising animals, and comes with two chickens by default.
The interior of the farmhouse is decorated to match the theme of the chosen map. This includes furniture, wallpaper and flooring. The exterior of the house is the same regardless of map choice.
There is an abandoned building on all maps which can later be turned into the Greenhouse. Once repaired, it can be moved by visiting the Carpenter's Shop or Wizard's Tower.
Map Types
| Name | Map | Description | Associated Skill |
|---|---|---|---|
Standard Farm |

|
||
Riverland Farm |

|
|
|
Forest Farm |

|
|
|
Hill-top Farm |

|
|
|
Wilderness Farm |

|
|
|
Four Corners Farm |

|
|
|
Beach Farm |

|
|
|
Meadowlands Farm |

|
|
Map Tab
The following gallery shows how each farm type appears in-game on the player's map tab.
Standard
Riverland
Forest
Hill-top
Wilderness
Four Corners
Beach
Meadowlands


References
History
- 1.0: Introduced Standard Farm Map.
- 1.1: Added Forest, Hill-top, Riverland, and Wilderness Farm Maps.
- 1.4: Added Four Corners Farm Map.
- 1.5: Added Beach Farm Map. Chat interface changes, which eliminated a bug preventing placement of path tiles near Cindersap Forest. Greenhouse can now be moved.
- 1.6: Added Meadowlands Farm Map. Players on the Riverland Farm Map get a Fish Smoker by default. Iridium Golems now spawn exclusively on the Wilderness Farm Map. Monsters now give 1/3 of normal Combat experience when spawned on the Farm.